Sunday, March 6, 2016

Adding the Finishing Touch to the Laundry Room--A Sliding Barn Door

 
The laundry room project is now officially done with the addition of the barn door! 


The old laundry room had a door that swung in (and took up a lot of room!)  Our friend wanted a custom door on a barn door slider. 


My husband got to work.  She lives in a 100+ year old house and wants the old style doors throughout. 


He made this door and left the opening for glass.  She chose seeded glass which adds some privacy.


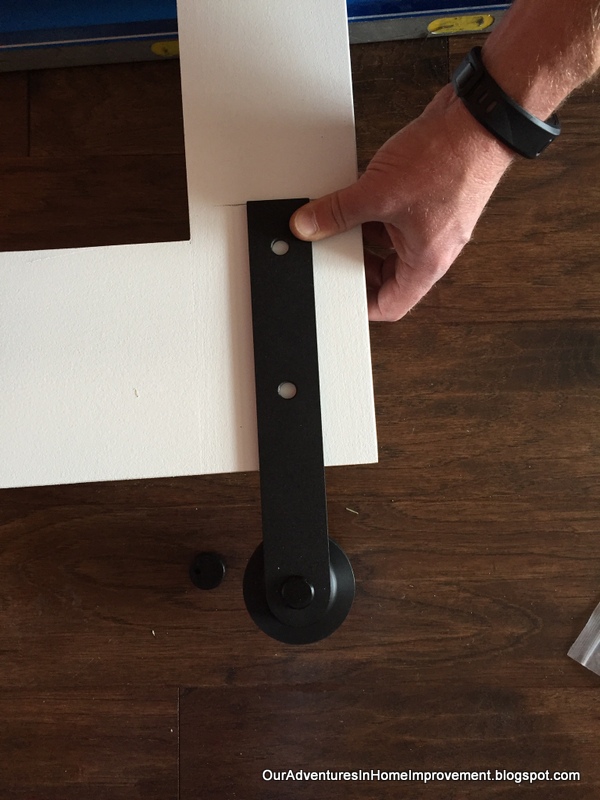
We installed the barn door hardware purchased from Amazon. 


 This was my first attempt of a vinyl cutout with my new Cricut machine.  I think it turned out pretty snazzy!


The new door keeps the sounds from the washer and dryer down and looks fab! 


Here's her redone laundry room.  It really turned out great!
 
Thanks for your visit!
 
Pam


I am linking to the following parties:
 
 
Dwellings-The Heart of Your Home


Friday, March 4, 2016

3 Easy Ways to Give Your Closet a Makeover

Closet Makeover 3 Ways


Transform your closet from an unnoticed place to stash your things into a treasured wardrobe of blissful organization. Here are three ways to beautifully revamp your closet. We’ll paint the closet, add decorative hooks and then attach colorful over-sized decals to the closet walls. No more drab closets!


Here are the steps to your closet makeover.


Closet Makeover


Behr Closet 1


Painting Materials


Tools


Behr Closet 26


Step 1


Clear your closet of items.


Behr Closet 10


Step 2


Tape off the trim and shelving with painter’s tape.


Behr Closet 12


Step 3


Load your paint brush with paint and cut in along the trim, shelves and corners of the closet.


Behr Closet 15


Step 4


With a paint-loaded roller, fill in the closet walls.


Step 5


Repeat Steps 3 and 4.


Allow the paint to dry, and remove the painter’s tape.


Behr Closet 22


Add Decorative Hooks


For bit more dazzle (and organization) in your closet makeover, add some decorative hooks.


Behr Closet 16


Step 6


Remove the closet rod and hardware from the closet walls.


Behr Closet 17


Step 7


Measure across the closet’s back wall.


Determine how many hooks you’d like to have across the wall.


Divide this number by the length of the wall and make a mark where the hook should be centered.


Behr Closet 20


Step 8


Using a power drill, screw the hooks to the wall.


Behr Closet 30


Add Wall Decals


For a closet makeover that will be the envy of all who see it, read on!


Behr Closet 2


Step 9


Measure length and width of the wall beneath your hooks.


Behr Closet 5


Step 10


Divide the area of the closet wall beneath the hooks evenly and mark your divisions.


Behr Closet 6


Step 11


Peel the decal backing off slightly, and position it on the wall over your mark.


Peel the remainder of backing off, and smooth it over the wall.


Behr Closet 7


Step 12


Repeat Step 11 for the remainder of your vinyl decals.


Behr Closet 28


And that’s your 3-step closet makeover.


Browse The Home Depot’s Paint Department for everything you’ll need for your next painting project. Our All About Paint board on Pinterest has plenty of painting tips and inspiration, too.


The post 3 Easy Ways to Give Your Closet a Makeover appeared first on The Home Depot Blog.

Ron Barth Responds to New Yorker Article on Carmel Place and NY’s Affordable Housing Situation

A recent New Yorker piece entitled “Are Micro-Apartments a Good Solution to the Affordable-Housing Crisis?” by Elizabeth Greenspan reminded me of a quote I once heard: “[The person] Who knows only his own generation remains always a child.” In order to understand the micro-apartment conversation, it’s essential to understand its historical context. Modern micro-apartments such […]


The post Ron Barth Responds to New Yorker Article on Carmel Place and NY’s Affordable Housing Situation appeared first on Resource Furniture.

Thursday, March 3, 2016

Installing Peel and Stick Tiles in a Basement Makeover

Installing Peel and Stick Tiles in a Basement Makeover


Peel and stick tiles are a great option for basement flooring. They’re durable, water-resistant and very easy to install.


Ursula Carmona of Home Made By Carmona is an avid DIYer with a sharp eye for attractive decor. She used peel and stick vinyl floor tiles in her basement makeover, turning the space into an attractive space for crafting and spending time with her kids.


Here, she shows us how she installed the vinyl tiles, and how gorgeous the whole basement looked when she was done. Don’t miss her clever way of installing the peel and stick tiles in tricky corners. That’s just one of her great tips for this DIY project. Then check out how she turned the basement into a well-organized and comfortable space.


Our basement was an absolute disaster. No matter how hard I tried to keep control of this glorified storage locker, it just kept getting worse. I swear it was destined to end up on an episode of “Hoarders” if I didn’t intervene.


Basement in need of a makeover


I wanted this space to become the ideal multi-purpose room. Space for me and the kids to do crafts, tons of storage, and preferably a seating area. I was sick of the disorganized chaos and ready for a big change!


Well, The Home Depot to the rescue! The first thing I did was select this really beautiful Limestone Vinyl Tile for the space. It dawned on me that I needed something not only stunning, but sturdy and easily cleanable for the crafting zone. This flooring will probably be hit with paint, glue and lots of glitter (can you tell I have three girls?).


Function always comes first. If you have kids, you know exactly what I’m talking about. Thankfully, I wouldn’t have to sacrifice fashion for great function.


Installing Peel and Stick Tiles in a Basement Makeover

These peel-and-stick vinyl tiles are gorgeous and very easy to install. Before you get started make sure the floor surface is clean, smooth, and has the recommended foundation type/sealant for the tiles you choose.


Peel and Stick Tile Basement Flooring


Materials for installing peel and stick tiles


Materials


Since my floors are primed concrete, my preparation mostly consisted of a good cleaning. Occasionally there were bumps or paint drips that needed to be removed with a scraper.


Ready to learn how to lay peel and stick tiles? Let’s get started!


Step 1: Find the center of the room and place your tiles for a test run


Start by finding the center of the room using a chalk line. You’ll be placing your tiles from the center and working your way out to the wall; this ensures a nice straight sight line, no matter how wonky the walls may be.


But first, lay your tiles with the backing paper still on for a test run.


How to install peel and stick tiles


Step 2: Adhere your tiles to the floor


Once your have placed enough tiles to ensure everything will look good and run straight, you can begin (with the center tile) to adhere it to the floor.


Just peel off the backing, line it up with the chalk intersection, and, easy as pie, you’ve begun your transformation!


Place each tile piece perfectly flush with the last. Pay attention to the flow of the grain, and if your tiles contain an arrow on the bottom be sure to place them all the same direction.


Step 3: Cut your tile to fit


Cutting peel and stick tile

When you reach the walls and have to start cutting your vinyl tile to fit, simply line up an uncut tile perfectly with the one just below the open space.


Place a second uncut tile over top of the open space (overlapping the tile you just placed below), make sure it is flush with the wall, then use the bottom to mark the tile beneath.


Cutting peel and stick vinyl tile

Now use shears to cut where you marked, and you’ll have the perfect size piece for that opening! Be sure you double check the fit with the paper backing still on.


Don’t you love that? No real measuring, just place, mark, cut.


How to Deal with Tricky Corners


How to install peel and stick tile

Occasionally you’ll run into slightly more tricky corners that require the traditional utility knife and carpenters square. Use the box the tiles came in to create a template for those places. Cut the box cover to the same size as the tile.


This time you may require a measuring tape; it just depends on how complicated your angles are. If you can get away with simply placing the cardboard against the angle and marking, then great…but you may still want to measure distances just to double check your work. Measure twice, cut once, right?


How to install peel and stick tile


How to install peel and stick tile

Cut out your cardboard template, and trim until it fits snugly into the open space.


How to install peel and stick tile


How to install peel and stick tile

Then you are ready to use it to trace onto your tile and cut the tile to size. Remember to double check the tile fit with the backing still on first!


With any luck, you won’t have too many tricky areas to contend with. I had five or six areas that took a little extra attention, but were still quickly handled.


I got through the entire floor fairly quickly for such a large space. I attribute that to how easy peel-and-stick vinyl tiles are to lay, but also the use of cutting with shears as oppose to scoring tiles with a utility knife and having to use a carpenter’s square. Small trick that helps shave off extra time and effort are well worth using!


The Rest of the Basement Makeover


Once the flooring was laid, the space came together very quickly.

What a drastic change! From dark, dingy, and disorganized, to bright and open! Would it be just wrong if I told you I that before I had doubts it could ever look this stunning, or be this organized? And I’m usually a “glass half full” decorator with loads of vision.


Basement Makeover

I brought in lots of storage with Closet Maid clear zip top bins, and made sure there was a home for every item so it will never become that messy again. A couple faux linen curtains are easily pulled to hide the open storage when desired.


Creating zones for each desired function is a must for a long space like this one.


In my crafting zone I was lucky to score some old kitchen cabinets roadside that made for lots of great storage and which  I was able to build a large work table from. The stunning Samantha aluminum bar stools made for practical and washable, yet elegant stools to craft from.


Always the art fanatic, I say every craft room deserves beautiful and inspiring wall art, and the City Escape wall art is no exception! I also make it a point to include a DIY pin and cork board in every space to hang kids art, magazine clippings, and more.


The lounge/seating area is grounded with a beautiful Amelia area rug both to warm the space and define the lounging area. Lots of great seating and good lighting for reading is important in the lounge space, so in addition to a thrifted reupholstered couch, I brought in the high backed Earnest accent chair and the chic modern Wiley floor lamp for a reading corner.


My newly made over basement is absolutely my dream mom-cave/craft room, and even the kids love spending time in it. No more running from the scary dark basement…now I can’t get a moment alone down there!  Go figure.


Basement Makeover

I hope I’ve inspired you to go take on that room you’ve been avoiding, and get your DIY floor-tile-laying self of awesomeness on. By the way, you’re going to love seeing the rest of this big reveal (and even more before and after photos)
here . Cheers!


Ursula Carmona writes about DIY, decorating and crafting on her blog, Home Made By Carmona. She lives near Cleveland, Ohio with her husband and three girls.


Browse The Home Depot’s selection of peel and stick tile in our Flooring Department. Follow our Flooring, Carpet and Rugs board on Pinterest for more flooring tips and ideas.


The post Installing Peel and Stick Tiles in a Basement Makeover appeared first on The Home Depot Blog.

Wednesday, March 2, 2016

Bathroom Transformation with Vinyl Tile

Bathroom Transformation with Vinyl Tile


Linda Gardner is a hopeless craft addict which lead to her Craftaholics Anonymous® blog to document her obsession. We asked Linda to channel her obsession onto The Home Depot Blog and document her reflooring project using vinyl tiles.


The result was simply amazing. Linda tiled her boys’ bathroom and made it look effortless and easy to follow. Read on to see how the transformation took place.


Bathroom Transformation with Vinyl Flooring


Bathroom Transformation with Vinyl Tile-- the


Above you can see the state of the bathroom before we replaced the floor.


Bathroom Transformation with Vinyl Tile


We added grout between the tiles to get a really stellar tile-like look. It looks just like tile! It’s gorgeous! This is the comparable after shot with the Luxury Vinyl Tile with dark gray grout.


The on-trend vinyl tile that I used was the perfect neutral color with both gray and brown undertones. I decorate with grays in this bathroom, so I chose a gray grout to draw out the gray tones more.


Vinyl tile is a snap to install! Here is how we did it.


Materials


Step 1: Remove existing flooring


Bathroom Transformation with Vinyl Tile


First, we removed the existing quarter round with a hammer and pry bar.


Bathroom Transformation with Vinyl TileThen we pulled up the existing vinyl flooring. It came out pretty easy.


Step 2: Plan the layout of your vinyl tiles


Bathroom Transformation with Vinyl Tile


Next we used a pencil, the angle tool, and a level to draw out the layout of the tiles.


We laid the tiles at a 45-degree angle.


Step 3: Place the tiles


Bathroom Transformation with Vinyl Tile


We peeled off the paper backing to expose the adhesive back. Then we laid the full tiles in place.


Place the spacers between the tiles to get the spacing right.


Bathroom Transformation with Vinyl Tile


If a tile was slightly off, we were able to pull the tile up and adjust it slightly.


Step 4: Cut the tiles to fit


Vinyl tiles are easy to cut.


Bathroom Transformation with Vinyl Tile


Simply score the tile with a utility knife and a straight edge. My hubby is using his level as a straight edge in this image above.


Bathroom Transformation with Vinyl Tile


Then bend the tile and it will snap along the scored seam. It was incredibly easy to do! No tile cutters, no shattering a tile trying to cut it.


The luxury tile was very user friendly.


Step 5: Fill grout lines


Bathroom Transformation with Vinyl Tile


After we finished laying the vinyl tiles, we mixed up the ready-mix grout and filled in the grout lines with a trowel.


We wiped up the excess grout with damp rags and allowed the grout to dry according to package instructions.


Bathroom Transformation with Vinyl Tile


Then we replaced the quarter round and put the rug back in place, and we were done!


Bathroom Transformation with Vinyl Tile


The resilient vinyl tile was so easy to install, and it looks fantastic!


The only thing that I didn’t like about the vinyl tile we chose, was that there were only two tile patterns to pick from. So we had to be creative in laying them out so that the same tile wasn’t completely duplicated right next to it with the design going the same direction. But we are pleased with the result.


Bathroom Transformation with Vinyl Tile


Linda Gardner is the brains behind the craft blog Craftaholics Anonymous. She covers pretty much everything one needs to know about crafting. From DIY decorating to sewing, Linda shares loads of free tutorials, tips, tricks and creative ideas! When she’s not crafting and blogging, Linda is in the kitchen baking yummy food.


The post Bathroom Transformation with Vinyl Tile appeared first on The Home Depot Blog.